I love our apartment. It has a wonderful layout, good natural lighting, and charming details like crown and picture molding. But there’s always room for improvement.
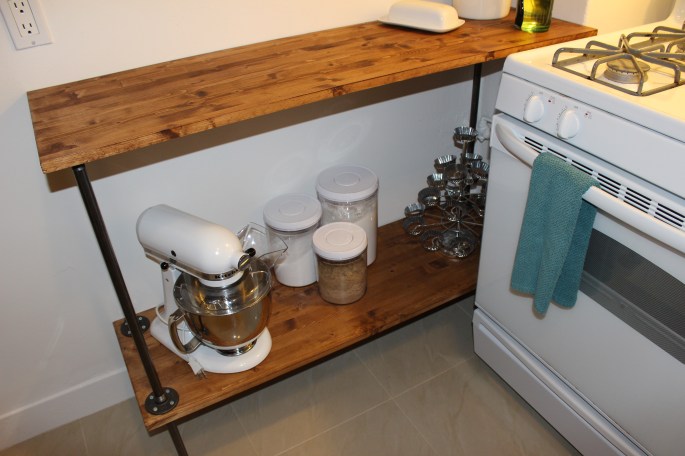
See below… wasted space to the left of the oven and no place to set cooking tools, gasp! No!
The oven sticks out a little further than the small wall with the gas pipe so I wanted something custom. I was “Pin-spired” by this cool coffee table DIY from diycozyhome.com

Here I will coin the term “Pin-spired.” Someone may already be using this, but I felt really clever when it popped into my head.
Basically you’ll need wood, plumber’s pipe, fittings, and screws. This project was easy to build, but it was not as cheap as I would have liked. My supplies came in around $250. If you shopped around you could probably do it for less.

I wanted the finished shelf to be counter top height, around 36 inches. To create some additional storage (who doesn’t need that?) meant finding a combination of two pipe lengths, plus the thickness of the wood, and fittings to reach the desired height.


A lovely employee at Discount Builder’s Supply in San Francisco cut my wood pieces to the dimensions needed to fit the odd space created between the wall and kitchen stove. I put a couple coats of stain on the wood and called it day. Ideally this should be coated with polyurethane to seal the wood, but I was trying to finish the project before the fiancé got home. I love a good makeover surprise.


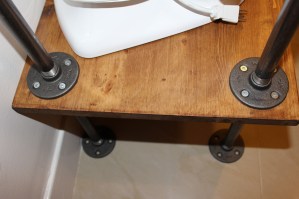
Screw the pipe fittings into the underside of the top and both sides of the shelf. When screwing into the shelf, be mindful to offset the fitting on each side so your screws don’t collide. Or if you don’t want the legs to line up you could just offset them. The threaded pipe screws right into the threaded fittings. The nice thing about that is it gives you a little wiggle room to twist the legs and adjust the height. Our tile floors aren’t level so this helped stabilize the shelf.
To date this has been one of the most useful DIY projects I’ve made. Not only do I love the new home for my baking supplies it’s incredibly practical for cooking. Ta-da!